Domino Application - ZEN style - Part 2

Continued from Part1.
Our application should start with a screen showing me only my documents and the option to switch to documents where I'm the approver. To do that I create a view based on the ($All) view and Just drag the Requestor column to the front. I also sort the view descending by date, so at some time older entries will disappear

The first column is categorized. A simple click will do. The column shows the content of the field requestor:

We have the formula
To insert the view I select Create - Embedded Element - View:

The Properties need adjustment. So I select to use HTML and allow for 50 entries and page width (on the second tab).

Last not least I add a formula to the Show Single Category Property. It must match the formula in the first column of the view, but instead Requestor I use @UserName:

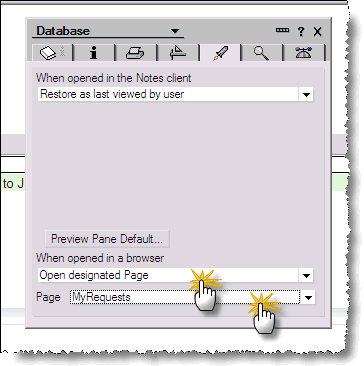
Finally I change the database launch property to use this page to open the database.
Now it is time for some action. The next step requires some understanding how Domino creates HTML. Whatever Domino does, it creates a form around it. So if I want to do something else I need to "cancel" out that form. I do that using </form>. To get proper formatted HTML I need to put an <form> tag at the end of the Notes form or page. Anything Domino should act on needs to be send back to Domino using the Domino URL syntax. You need to check the developer's help for details. For our purpose here I will use the ?CreateDocument syntax we already used to create requests. We will use that to create documents with the form FormAction. These documents will not be saved, but serve as the temporary container for our action. Of course you could save them for audit purposes. The trick here is to send html fields to the form's fields, so the formulas can act on them.

To add fields to the form I first add 2 submit buttons with a name below the view. One to delete un-approved requests, one to submit for approval. One important aspect here: Both buttons must have the same name:
<input type="submit" name="NextAction" value="Remove Request" />
<input type="submit" name="NextAction" value="Submit for Approval" />
Now we need to be able to select documents. To do that I edit the # column in the view and put in the following formula. It uses the internal primary key for document, the DocumentUniqueID to indicate what documents have been selected. Of course I only want to allow action if the status matches, so the formula has a @if statement:
This will put a checkbox in front of every document where I still can make a decision.
The result looks like this:

Now it is time to create the FormAction Form. It will contain a few fields:

The formula in the Action... fields are very similar. First we check if the action needs to execute, then we set the Status and DocAuthors field of the respective documents. To do so we use the @For formula (Check the online help for details). The formula for submit for approval looks like this:
The other formulas don't have the second last line, since all author access will be removed. And voila we have an almost working system. At least we can: create requests, submit request, revoke request. The only thing left is to be able to approve or reject them. By now you should have an idea how that will work. Our mechanism is in place (the FormAction Form), we just need to make copies of the view MyRequestList as MyApprovalList and the page MyRequests to MyApprovals and change a few things: Swap the column formulas for the categorized column and change the value of the two submit buttons to "Approve" and "Reject" and last not least change the name of the embedded view. So a little cut and paste will do.
Also you want to adjust the view formula, so the approver will only see documents that (s)he needs or did act on:
Now we have a fully functional mini approval application. It only lacks 2 things: a archival function (try an agent with a simple action) and "the looks". Luckily my web designer friend comes to the rescue with some graphics and a css file. Both can be added in the resource section of Domino designer:

To activate the style sheet. I go into the Request form, the $$ViewTemplate for $All and the pages, select the HTMLHeadContent event and right click to add the stylesheet:

The result is not too bad isn't it (OK, the CSS does need some work)

You can download the database and play with your own CSS!
Our application should start with a screen showing me only my documents and the option to switch to documents where I'm the approver. To do that I create a view based on the ($All) view and Just drag the Requestor column to the front. I also sort the view descending by date, so at some time older entries will disappear
The first column is categorized. A simple click will do. The column shows the content of the field requestor:
We have the formula
@Name([Abbreviate];Requestor) in the column. We could replace that with Requestor or leave it. It doesn't really matter. What matters is to use the same style later in the page when we embed the view. We will come back to the view in an instant to refine it. Now it is time to insert it into the page. I copy the content from the $$ViewTemplate for ($All) into a new page MyRequests. Doing that you will realize, that the field $$Viewbody doesn't get copied. A page can't hold fields.
To insert the view I select Create - Embedded Element - View:
The Properties need adjustment. So I select to use HTML and allow for 50 entries and page width (on the second tab).
Last not least I add a formula to the Show Single Category Property. It must match the formula in the first column of the view, but instead Requestor I use @UserName:
Finally I change the database launch property to use this page to open the database.
Some code required
Now it is time for some action. The next step requires some understanding how Domino creates HTML. Whatever Domino does, it creates a form around it. So if I want to do something else I need to "cancel" out that form. I do that using </form>. To get proper formatted HTML I need to put an <form> tag at the end of the Notes form or page. Anything Domino should act on needs to be send back to Domino using the Domino URL syntax. You need to check the developer's help for details. For our purpose here I will use the ?CreateDocument syntax we already used to create requests. We will use that to create documents with the form FormAction. These documents will not be saved, but serve as the temporary container for our action. Of course you could save them for audit purposes. The trick here is to send html fields to the form's fields, so the formulas can act on them.
To add fields to the form I first add 2 submit buttons with a name below the view. One to delete un-approved requests, one to submit for approval. One important aspect here: Both buttons must have the same name:
<input type="submit" name="NextAction" value="Remove Request" />
<input type="submit" name="NextAction" value="Submit for Approval" />
Now we need to be able to select documents. To do that I edit the # column in the view and put in the following formula. It uses the internal primary key for document, the DocumentUniqueID to indicate what documents have been selected. Of course I only want to allow action if the status matches, so the formula has a @if statement:
@If(Status="New":"Draft":"Pending Approval";"<input type="\"checkbox\"" name="\"SelectedDocuments\"" value="\""+@Text(@DocumentUniqueID)+"\"" />";" ")
This will put a checkbox in front of every document where I still can make a decision.
The result looks like this:
Now it is time to create the FormAction Form. It will contain a few fields:
- SaveOptions, Text, Computed "0" --> this form actually never gets saved
- SelectedDocuments, Text MultiValue, Editable --> contains a list of Document keys to be acted on
- NextAction Text, Editable --> Contains the selected action
- $$Return, Text, Computed --> You know that already.
- One field for every action, Text Computed --> the business logic. I spread the logic out into different fields to make it easier to maintain. You could lump them all into on field.
The formula in the Action... fields are very similar. First we check if the action needs to execute, then we set the Status and DocAuthors field of the respective documents. To do so we use the @For formula (Check the online help for details). The formula for submit for approval looks like this:
 @If(NextAction="Submit for Approval";"";@Return("")); REM {Only act on the status that is defined for this field};
 tmpCount := @Elements(SelectedDocuments)+1;
 tmpStatus := "Pending Approval";
 tmpAuthor := "-none-";
 @For(x:=1;x<tmpCount;x:=x+1;
    tID := selDoc[x];
    @SetDocField(tID;"Status";tmpStatus);
    tmpAuthor := @Trim(@Unique(@GetDocField(tID;"Requestor"):@GetDocField(tID;"Approver")));
    @SetDocField(tID;"DocAuthors";tmpAuthor))
The other formulas don't have the second last line, since all author access will be removed. And voila we have an almost working system. At least we can: create requests, submit request, revoke request. The only thing left is to be able to approve or reject them. By now you should have an idea how that will work. Our mechanism is in place (the FormAction Form), we just need to make copies of the view MyRequestList as MyApprovalList and the page MyRequests to MyApprovals and change a few things: Swap the column formulas for the categorized column and change the value of the two submit buttons to "Approve" and "Reject" and last not least change the name of the embedded view. So a little cut and paste will do.
Also you want to adjust the view formula, so the approver will only see documents that (s)he needs or did act on:
SELECT Status = "Pending Approval":"Approved":"Rejected";
Now we have a fully functional mini approval application. It only lacks 2 things: a archival function (try an agent with a simple action) and "the looks". Luckily my web designer friend comes to the rescue with some graphics and a css file. Both can be added in the resource section of Domino designer:
To activate the style sheet. I go into the Request form, the $$ViewTemplate for $All and the pages, select the HTMLHeadContent event and right click to add the stylesheet:
The result is not too bad isn't it (OK, the CSS does need some work)
You can download the database and play with your own CSS!
Posted by Stephan H Wissel on 06 August 2007 | Comments (2) | categories: Show-N-Tell Thursday