wissel.net

Usability - Productivity - Business - The web - Singapore & Twins

By Date: April 2019

LWC components with self contained images


When you create your LWC components, it is easy to include Salesforce predefined icons using lightning-icon. However once you need a custom icon, you point to an external URL, breaking the self containment. Unless you use url(data:). Here is what I did

A scalable check mark

Dynamic Lookup

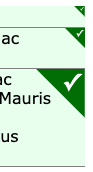
For a list selection component I wanted a green check mark, like the picture above, indicate a selected record (more on the component in a later post). Since LWC doesn't allow (yet?) to store image assets inside a bundle and I wanted the component to be self contained.

The solution is to use data:image/svg+xml for a background image. The details were nicely outlined in css-tricks. I tried to use svg as source code directly, but failed to get it to work. So I resorted to use base64. It is an additional step, using an online Base64 encoder.

Making images

SVG is just an XML based text format, so you could create your image in notepad (take that jpg!). However you probably want to use a graphic editor. My choice here is Sketch (which gives me funny looks from designers: why a developer uses one of their tools). There were some steps worth to mention:

  • When using text (like the check mark), convert that to a svg path. Right click on text and select "Convert to outlines". This allows the text to scale with the rest of the image
  • Use the Edit-Copy-Copy SVG Code rather than use the export functionality
  • The resulting SVG is "talkative", you can edit and remove quite some content:
  • remove width and height attributes from the <svg> element, but keep the viewbox. Also remove the xlink name space
  • the <g> element doesn't need any attribute
  • <polygon> only needs fill and points attribute
  • All numeric values have many digits. You can round them up

Read more

Posted by on 18 April 2019 | Comments (0) | categories: Lightning Salesforce

Lightning Layouts, Input Fields and Field Level Security


The more control you want (or need) to exercise over the page layouts presented to your users, the more details you need to take care of. While the default record details and the lightning-record-form take care of hiding fields, without a trace, the current user doesn't have access to, you need to handle that yourself in a custom layout. Here is how.

Show me yours

A typical custom form layout might look like this:

<template>
    <lightning-record-edit-form
        record-id={recordId}
        object-api-name="Contact"
        onload={formLoadHandler}
        onsubmit={formSubmitHandler}
        onsuccess={formSuccessHandler}
    >
        <lightning-layout multiple-rows="true">
            <lightning-layout-item size="12">
                <lightning-messages> </lightning-messages>
            </lightning-layout-item>
            <lightning-layout-item padding="around-small" size="6">
                <lightning-input-field field-name="Name">
                </lightning-input-field>
            </lightning-layout-item>
            <lightning-layout-item padding="around-small" size="6">
                <lightning-input-field field-name="Department">
                </lightning-input-field>
            </lightning-layout-item>
            <lightning-layout-item padding="around-small" size="6">
                <lightning-input-field field-name="HomePhone">
                </lightning-input-field>
            </lightning-layout-item>
            <lightning-layout-item padding="around-small" size="6">
                <lightning-input-field field-name="CleanStatus">
                </lightning-input-field>
            </lightning-layout-item>
            <lightning-button
                class="slds-m-top_small"
                variant="brand"
                type="submit"
                name="save"
                label="Save"
            >
            </lightning-button>
        </lightning-layout>
    </lightning-record-edit-form>
</template>

Now, when a user doesn't have field level access to, let's say HomePhone (GDPR anyone?), the form would render with an empty space in the second row. To prevent this two steps are necessary:

  • Add a render condition to the lightning-layout-item
  • Compute the value for it in the onload event of the lightning-record-edit-form

A lightning-layout-item would look like this:

<lightning-layout-item padding="around-small" size="6" if:true={canSee.HomePhone}>
    <lightning-input-field field-name="HomePhone">
    </lightning-input-field>
</lightning-layout-item>

The only difference is the if:true={canSee.number}

In your JavaScript file you add @track canSee = {} to initialize your visibility tracker. Finally you amend the formLoadHandler to populate the canSee variable:

formLoadHandler(event) {
        let fields = event.detail.record.fields;

        for (let f in fields) {
            if (fields.hasOwnProperty(f)) {
             this.canSee[f] = true;
            }
        }
    }    

As usual YMMV.


Posted by on 11 April 2019 | Comments (0) | categories: Lightning Salesforce

Mixing lightning-input-fields with custom data aware fields


Salesforce lightning offers a developer various ways to design custom forms when page layouts are not enough. The record-edit-form strikes a nice balance: it uses Lightning data service and allows one to design your own layout and field selection.

Beyond lightning-input-fields

Most of the time lightning-input-field is all you need for this forms. They auto-magically talk to the UI API and display the right input type.

However there are cases, where that's not what your users want. A recent example from a project: Phone numbers are stored as text field in Salesforce, but the users wanted a guided input: a country picker, then showing the area code picker (if the country has those) and an checker for field length for the main number (which varies greatly by country) and an eventual extension field (popular in the US, but not elsewhere).

So I started digging. Shouldn't it be possible to have something like <c-phone-helper field-name="Phone" /> and the same data magic as for lightning-input-field would happen? Turns out: not so fast. With events and a little code it would be possible, but that glue code needed to be applied to any custom field.

This got me thinking. The solution, it turns out, was to "extend" the record-edit-form to handle "rough" input components. You can give the result a try in experiment 8

Design goals

  • The component should be a drop-in "replacement" for record-edit-form
  • Structure of a page should be similar to they way one builds record-edit-form based forms
  • All lightning-input-fields should work out of the box
  • No additional glue code should be required in the component hosting the new form
  • Custom input field types should be easy to build. Once I figure out extensions, based on a base component
  • Opinionated: form layout is using a lightning-layout

Results

The replacement for lightning-record-form is c-extended-form (from experiment 8).
"Replacement" is a mouth-full, since the component just wraps around a lightning-record-form. A few components are ready to be used for it:

  • specialInput a little test component. It just returns the input in upper case. Not very useful other than studying the boiler plate
  • uxDebouncedInput returns changed values after a debounce period. Default is 300ms, the attribute delay allows to specify duration. The component shows different behavior depending on the attribute field-name being present with a value. The original purpose of the field is to be used in uxQuickLookup, now you can use it standalone
  • uxQickLookup which allows you to lookup an object. It works in lightning apps, mobile and communities and can serve as a stop-gap for the missing lookup on mobile. I recently updated it to show additional fields beside the object name

How it works


Read more

Posted by on 06 April 2019 | Comments (3) | categories: Lightning Salesforce WebComponents

Dynamic Lookup for LWC - update


There's always room for some improvement. So I updated

Dynamic Lookup

Is this the account you are looking for?

The dynamic lookup works like a charm, including on the Salesforce mobile app. The only catch: with only the object name visible it was less useful than the standard lookup. There are too many objects with the same name.

The solution: I added a new parameter fields that allows to specify the fields you want to be displayed. To separate them, I choose Badges. IMHO there isn't much value in showing fieldNames and mess up the display.

The source code can be found in Experiment 5, enjoy! As usual YMMV!

Next stop: proper Jest test harness


Posted by on 06 April 2019 | Comments (2) | categories: Lightning Salesforce

Massive leak of Credit Card Pin Numbers


It seems that Data leaks are considered unavoidable like the flu, taxed or measles outbreaks for vaccination-deprived kids.

There's quite a list:

Kiss goodbye your PIN

You might think, it couldn't get worse, but it did. In an unprecedented development all, yes all of the 6 digit credit card pins have been revealed and posted online.

You can check: your pin will be in that stash. But be careful! Online searches are captured, potentially allowing an attacker to link the numbers back to you. So when inspecting the stash, either look manually or download and search locally.

Of course: you got that file on your local disk, someone might start asking questions. So be considerate!

Update

A single forgotten console.log(...) statement was the source that leaked all those numbers.

The full code, released on APRIL 01 is here:

/* Generates all 6 digit pins in a random order */
const max = 1000000;
const ppl = 10;
const pins = [];

// Prepopulate sequentially
for (let i = 0; i < max; i++) {
  pins[i] = (' 000000' + i).slice(-6);
}

// Randomize location
for (let i = max; i >= 0; i--) {
  let p = Math.floor(Math.random() * i);
  let n = pins[p];
  pins[p] = pins[i];
  pins[i] = n;
  if (i % ppl == 0) {
    console.log(pins.slice(i, i + ppl).toString() + (i == 0 ? '' : ','));
  }
}

Hope you enjoyed it!


Posted by on 01 April 2019 | Comments (2) | categories: Salesforce Singapore